Showing posts with label iPhone & iPad. Show all posts

How to Update Your iPhone, iPad, or iPod Touch-TechZilla Firefox


For getting the right use of any iOS device there must be a regular Update. There are so many ways to get this task or generally option for individual update is more common and is time consuming.

Update-iPhone-iPad-iPod-Touch


Apple provide a unique method for an iOS device update, which can be done easily and effectively than any other methods. Let me explain 

Update Your Ipad, iPhone, or iPod Touch


1) Connect your device to a Power Source

2) Go to Setting --> General --> Software Update

ios7-software_update


3) Select Download and Install for Update download. [Update might done automatically while in Wi-Fi network or when device is connected to a Power source] 

Update-iOS-Touch


4) Choose Install or Later with your option


5) Install Latest Version of iTunes in computer


6) Plug in your iOS device to computer


7) Select your iPad, iPod, iPhone touch in iTunes


8) Go to Summary Pane --> Check Updates 


Latest-iTunes


 9) Choose Download and Updates

Latest-iTunes-Download


Note: For any Error while Update, please refer Apple's Troubleshoot over take.

See: How To Create a Strong Passcode for your iOS Devices


Top 10 Best Android Phones Secret Codes for Daily Life-TechZilla Firefox


Best-Android-Phones-Secret-Codes

Few weeks ago, my friend Sandra asked me for a help to test her Bluetooth and Wi-Fi of her new Android phone. Unfortunately as an normal mobile user I wasn't able to give her the solution at that instant. But in the very next morning I fetched result by a long search from Android market.
It's quite impossible or practically no one hold the memory on such hidden secret codes in phones unless they have find an unavoidable situation. 

So keep mind some of very useful Android Secret Codes from here. It will be more beneficial to you once you find its need. Also Find: How to change the Start Screen Background of a Windows 8 OS


                                                *#*#4636#*#*

Type this code in your Android dialing panel, will display the informations about:
  • Phone Information
  • Battery Information
  • Battery History
  • Usage Statistics
  • Wi-Fi Information


                                                *2767*3855#

This code is for factory format or formatting your Android phones. So you must please think what you are going to do. 

You won't get any chance to cancel the operation once you typed the last character [#] in the above string otherwise remove the battery [cause future damage to your Android set]. This results
  • Remove files and settings in Internal memory storage.
  • Reinstall Android phone firmware.

                                                 *#*#7780#*#*

Execution of this code will cause following to Android phones: 
  • Removal of Google account settings stored in Android phones. 
  • Removal of System and application data and settings  from Android phones
  • Removal of Downloaded applications from Android phones
 This won't affect Your: 
  • SD Card files 
  • Current system software and bundled applications 

                                                *#*#34971539#*#*

This code show your Android phone's Camera details, includes:
  • Update camera firmware in SD card
  • Get camera firmware version
  • Update camera firmware in image
  • Get firmware update count
Note: Don't use the 3rd option, it will cause your Android phone's camera to stop functioning. You need to reinstall the camera firmware if anything happened due to any misuse. 


                                           *#*#273283*255*663282*#*#*

You can use this code to backup your media files e.g Sounds, Images, Video, Voice memo. Once you entered the code it bring you to a new File copy screen where you are free to backup your files from Android Phones.


                                                *#*#197328640#*#*

This code can used to enter into Service mode, where you can run various tests and free to change settings.


                                                    *#*#7594#*#*

This can be used to change End Call / Power button action in Android phones. Normally you have to hold button few seconds to select your mode of action like Power Off, Silent, Aeroplane etc. Alternatively use this code to revert to your need.


                                                    *#*#8255#*#*

Enter this code in your Android phone's dialing panel to launch GTalk Service Monitor.


                              Codes to launch various Factory Tests:
  • Touch screen version - *#*#2663#*#* 
  •  LCD  - *#*#0*#*#* 
  •  Packet Loopback - *#*#0283#*#* 
  •  Melody  - *#*#0673#*#* OR *#*#0289#*#* 
  •  RAM version - *#*#3264#*#* 
  •  Touch screen  - *#*#2664#*#* 
  •  Proximity sensor  - *#*#0588#*#* 
  •  Device test (Vibration  and Back-Light ) - *#*#0842#*#

                               Codes for WLAN, GPS and Bluetooth Test
  • Bluetooth  - *#*#232331#*#* 
  • GPS  - *#*#1472365#*#* 
  • Shows WiFi MAC address - *#*#232338#*#* 
  • Another GPS  - *#*#1575#*#* 
  • Shows Bluetooth device address - *#*#232337#*# 


Note: Remember you can apply these secret codes in any Android phones. This won't work on other phones.

How to Open Any Mobile Websites on Computer Browsers - Chrome, Firefox and Internet Explorer


Nowadays it is hard to avoid internet in our daily life. For each and every doubt or specifically for each of our needs, we approach internet, because it has the better solutions. There are millions of websites offering their services over the internet, can be completely accessed using a PC or a Mobile device. 

Many websites offer specific interfaces for iOs, Windows phones, android, and other mobile versions in addition to PC interface. But certain website is built for only accessible via mobile, and is failed to load in PC browsers like Google Chrome, Mozilla, Internet Explorer.

Advantages

  • Improved website loading response
  • Lower data usage compared to PC's browser 

Setting a Mobile User Agent

To open any mobile websites in your PC's browser, you have to change the User agent. For both Chrome and Mozilla, free user agent switcher extension is available. 

Locate the extension in your browser, click it, and choose your mobile user agent from the list. For Internet Explorer you may want to try the UAPick User-Agent Switcher add-on.

 For Chrome Users


open-mobile-websites-in-computer-browser


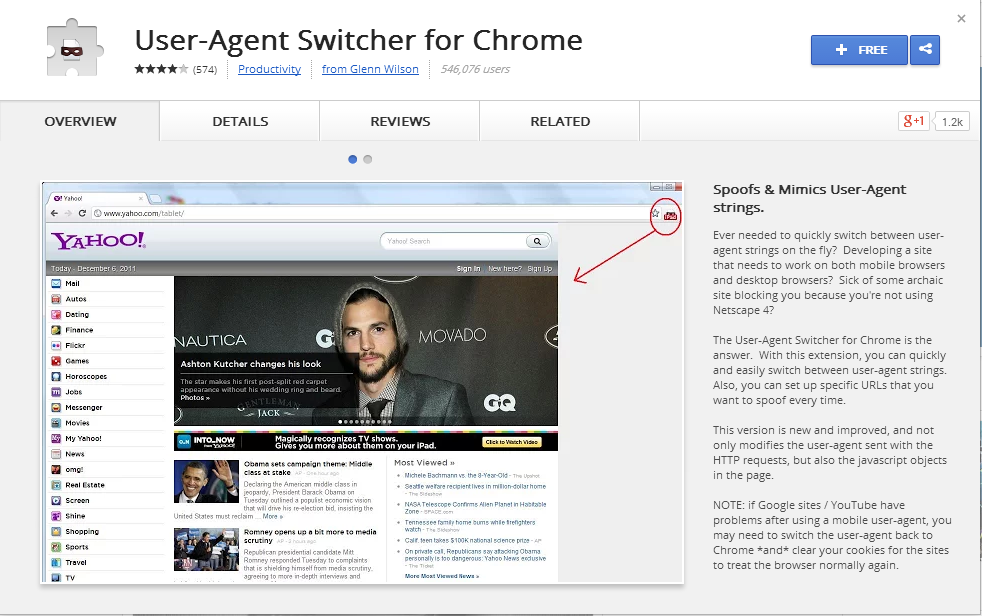
  • First download user agent switcher extension from chrome store using search for "user agent switcher"  or alternatively from here, Download User Agent Switcher 

User-Agent-Switcher-for-Chrome

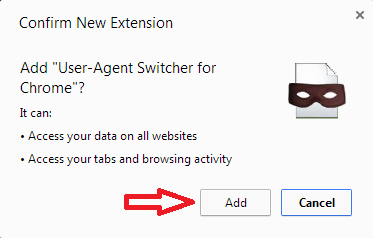
  • Install it on your browser by click "Add" and then open the new extension. 

user-agent-for-iOS-Android-Windows

  • Now from the list of user agents choose one that you opt. 


 For Mozilla Users


Open Mozilla browser in your PC, and search for "user agent switcher addon" in Mozilla add-ons page or you can download it from here, Download User Agent Switcher.


user-agent-switcher-for-firefox

  • A confirmation box will show for the user, click Add to Firefox


user-agent-install-on-firefox

  • Select "Install Now" button for the installation of user agent switcher


user-agent-for-iOS-Android-Windows-for-firefox

  • Now restart the browser for completing the installation process. After that you will get this addon on Tools menu named as “Default user agent switcher”.
  • Select iPhone 3.0, now you are able to see any website in mobile interface.


 Additional User Agents


Some user agent switchers don’t come with a comprehensive list of user agents. For example, the User Agent Switcher extension for Firefox doesn't include an option that allows you to set your user agent to an iPad’s. 

Additional user agents can be downlaod by clicking the User Agent Switcher icon and then selecting Edit User Agents. Click Download lists of user agents to import link and you will be able to download and import more comprehensive list of user agents.


download-lists-of-user-agents-to-import


 Alternate Method - Opera Mini Simulator


Opera mini simulator is an another option for opening mobile websites on PC's browser. Unlike in mobile user agent switcher, it doesn't need installation of any software. Just follow the steps

  • Open your current PC browser and paste below link in address bar  http://www.opera.com/developer/opera-mini-simulator

  • Now a dialogue box with asking your permission for running Jave Object will show up, click allow and run opera mini simulator

  • Now , to open any websites in mobile version, just use mobile simulator. 
See: How to Block Websites In your Computer - Included Adult+ Security


How to Recover Deleted/Lost Pictures From Mobile Phone/ Digital Camera


A mobile phone is also called cell phone and cellular phone in some regions. Almost all phones in the market are now equipped with a digital camera (camera phone). There are different occasions on which cell phone or mobile phone users may delete their valuable pictures they have taken. This may happen when formatting the phone memory card by mistake, or damaging the memory card in the phone, or losing the photos on the memory card for some reason.


There are several memory card types used in cell phones and Digital Camera such as Memory Stick Micro (M2), which is widely used in Sony-Ericsson phones. MicroSD, MiniSD, MicroSDHC, TransFlash card, RS-MMC are other popular phone memory card types used in Nokia, Motorola, and other phone brands.

You can use any of the Memory Card type as your external data storage device along with inbuilt phone memory. When you use Mobile phone, there are two storage option one is SD card (Memory card) and second one is Phone memory. Once you delete/lost Pictures, Songs, Videos, films from Mobiles and Pictures from digital camera, it is difficult to regain removed file.


How to Recover Lost Data From Mobiles, Digital Cameras.

Supported Card and Storages

  • All mobile memory cards
  • SD Card(Secure Digital card), MicroSD (TransFlash), SDHC, miniSD card
  • MMC card MultiMedia card
  • CF card , Compact Flash card, CF Type I, Type II, MicroDrive
  • Memory Stick, Memory Stick Pro, Duo, Pro-HG, XC, Micro(M2)
  • SmartMedia, flash card recovery
  • xD Picture card recovery

Supported Devices by Manufacturer

  • Nikon, Canon, Kodak, FujiFilm, Casio, Olympus, Sony, SamSung, Panasonic
  • Fuji, Konica-Minolta, HP, Agfa, NEC, Imation, Sanyo, Epson, IBM, Goldstar
  • LG, SHARP, Lexar, Mitsubishi, Kyocera, JVC, Leica, Phillips, Toshiba, SanDisk
  • Chinon, Ricoh, Hitachi, Pentax, Kinon, Verbatim, Vivitar, Yashica, Argus, Lumix
  • Polaroid, Sigma and almost all digital camera brands on the market


Accidental Deletion Events

  • Delete -- "Shift + Del" key entry (with no prior backup)
  • "Delete All" selected in error
  • Selected "Delete" instead of "Save"
  • Recycle Bin erroneously emptied (and no backup)

Accidental Formatting or Reformat (examples of recoverable events)

  •  Formatted Media/Device in error
  •  Initialized target storage when memory card newly connected
  •  Storage device accidentally formatted

Improper Operation 

  •  Factory reset
  •  Powered off device (camera etc.) during write process
  •  Card mistakenly used in different cameras
  •  SD Card removal while device is powered on


Google recommended CardRecoveryPro as the best tool to regain your lost data. Go through the below 3 easy steps to recover everything you lost.

1) Install CardRecoveryPro (2.2 MB)


2) Connect your Mobile's/Digital Camera's Memory card to PC


recover-lost-pictures-from-mobiles-memory-card-digital-camera


3) Select "Scan", this will show you the lost data from your device. Choose one or multiple to recover.


How to Use Multiple iPhone, iPad, or iPod devices on Same Computer


Some time it is required to use multiple iPhone, iPad, iPod in a single computer system. It is possible but you have only few options. Here I prescribed for active Windows and Mac users who wish to use multiple device on your system. 


use-multiple-devices-on-same-computer-Techzilla Firefox


There are two option provided, either you can use your existing user account or use multiple user account for each device you want to sync. When you have created multiple user account on your system you can create separate iTunes's playlist for each device and able to switch between them (Mac and Windows). With a single user account you cannot simultaneously sync multiple devices on Windows.


See: How to Import all iPhone and iPad Contacts into Gmail


How to create multiple user Account

Choose your operating system and follow the Apple's Official Guidance
  1. Mac Users
     2.  Windows Users
  • Click the Start Menu and click Help or Help and Support.
  • Enter "new user" in the Search field.
  • Press Return.

See: How To Create a Strong Password for your iOS Devices


Some time you use same user account to connect different device on same system. To do this, you can set iTunes to update each device with only certain playlists. This method allows you to put all your music on, for example, your iPod and keep your iPod shuffle updated with only your workout music. Here's how to do this with iTunes:

  • Create a iTunes playlist with all music you want to sync with each devices.
  • Sync You device 


How to Create Separate iTunes Library for each Device

  1. Mac users: Hold down the Option key while you open iTunes.                     Windows users: Hold down the Shift key while you open iTunes.
  2.  Select "Create Library".
  3. Name and save library file and iTunes will open with new library file.
  4. Select iTunes preference. Choose iTunes > Preferences (Mac) or Edit > Preferences (Windows).
  5. Click advanced tab.
  6. Remove "Copy files to iTunes Media folder when adding to library" if it is already selected and click "OK". This prevent iTunes from creating duplicate of your existing library files.
  7. Add your media file from device to system either by dragging into iTunes or select File--> Add to Library or File (Mac)-->Add File to Library or Add Folder to Library (Windows).
  8. Sync your device.
  9. After completion of proper syncing, quit iTunes.
  10. Now you can use step 1 to open your iTunes and select your desired Library. For changing the device simply switch between different libraries for different devices.

How to Import iPhone,iPad Contacts into Gmail


Importing personal details from any device to Gmail and other network services is very essential for maintaining contacts. Many users are trying to import their contacts details to Gmail but they failed. You can access this service with an iCloud and Gmail account. Let me explain. 


import-contacts-from-iPhone-to-Gmail-Techzilla Firefox


1.First you tap the Settings Icon on your iPhone/iPad.

2.Then Tap iCloud to enter iCloud settings.

3.Enable Contact Sync with iCloud. Make sure the slider bar for the “Contacts” category is enabled (green). This will make sense and make your iCloud account is always synced with your iPhone.

See: How To Create a Strong Passcode for your iOS Devices

sync-contacts-with-iCloud-Techzilla Firefox

4. Navigate to iCloud.com. Use any web browser as your choice (I prefer Google Chrome, Mozilla Firefox ), navigate your PC or Mac to icloud.com. Then sign into your iCloud Account, and enter your Apple account credentials.


iCloud-Techzilla Firefox

 5. Click the Contacts Icon.


6. Click on Settings, then “Export vCard” This will download a file to your computer which you’ll use to upload into Gmail’s contacts .

iCloud-Export vCard-to-gmail-Techzilla Firefox

 7. Go to Gmail.com.


 8. Click Contacts.


import-contacts-from-iPhone-iPad-iPod-to-Gmail-techzilla Firefox

9. Click the “More” dropdown menu in Contacts, and select “Import.”


10. Click  ”Choose File” and find the .vcf file you downloaded from your iCloud account. It will be found in your “Downloads” folder on PC or Mac.


contacts-imported-to Gmail-Techzilla Firefox


 11. Click “Import” to bring your contacts into Gmail. When you have done all your iPhone/iPad contacts will be linked to Gmail.


See: How To Create An Undeletable And Unrenamable Folder In Windows - Without Any Software


Updated Keyboard Shortcuts for iPhone & iPad ( for iOS 7)


Are you tired of typing difficulty, that probably meet when you use any iOS device? Here is the 10 most useful shortcuts that will help you type faster using the on-screen keyboard of your iPhone, iPad or iPod Touch. The screenshots have been updated for iOS 7.

See Also: How To Create a Strong Passcode for your iOS Devices

Tip #1: If you want to type special characters with accent marks (like the letters à or è), simply tap and hold the corresponding alphabet key for a while and it will pop-up a list of related accented characters for you to choose from. Don’t release the key before making a selection else the choices will disappear.

accent-marks-Techzilla Firefox

                                                                         
Tip #2: When you are done typing a sentence, double-tap the space bar on the keyboard and it will automatically insert a dot (or period) followed by a space. The next alphabet that you type will be written in uppercase without you having to press the Shift key.

Tip #3: The iOS keyboard is pretty smart at adding apostrophes. For instance, if you need to type “doesn’t”, just forget the apostrophe and quickly type “doesnt” – the keyboard will automatically insert the apostrophe at the appropriate place. You can also press and hold the comma key to get the apostrophe without switching to the numeric keyboard.
currency-symbol-Techzilla Firefox


Tip #4: The numeric keyboard (.?123) on your iOS device shows the dollar ($) symbol by default. However, if you need to type the Pound or the Euro currency symbol, just hold the $ key and you’ll see a long list of alternative currency symbols.

See Also: How to Play YouTube Videos in the Background on iOS

punctuation-Techzilla Firefox

Tip #5: If you want to change the style of quotation marks or need to use a longer dash punctuation mark instead of the default hyphen, press and hold the corresponding key.  For typing the degree symbol in your email message, switch to the numeric keyboard and hold the ’0' key for a while.

See Also: How to Download Google Maps Offline on your iPhone and iPad>

Tip #6: Typing the whole sentence in capital letters is often considered rude but there can be instances where you may have to type a word or two in uppercase.

In the default setting, you’ll to have to tap the Shift key after typing every single character or you can “Enable Caps Lock” under Settings –> General –> Keyboard and then double-tap the shift key to turn it into a Caps lock key. They will stay dark until you press the key again.

caps-lock-Techzilla Firfox

Tip #7: While you are inside the Safari browser, type only the domain name and then press and hold the dot (.) key. It will offer you an option to add popular domain extensions (or TLD) like .com, .org or .net to your web address with a tap.


Tip #8: You can also use the dot key in the Mail app of your iPhone or iPad to type email addresses quickly. While typing an email address in Mail, press and hold the dot (.) key and you’ll get a list of domain extension to auto-complete your email address.

domain-extensions-Techzilla Firefox

Tip #9: You can split the iPad keyboard into two and type faster with both your hands while holding the device. While the on-screen keyboard is visible, press and hold the keyboard icon in the lower right and choose the Split option. If the option isn’t available on your iPad, go to Settings -> General -> Keyboard and toggle the Split Keyboard option.

See Also: Best 15 Sites For Watch Free Movies Online | 2014

Tip #10: Here’s another useful but undocumented keyboard trick that will help you quickly switch between numerical (123) and alphabetical (ABC) keyboards on your iOS device.


Let’s say you are typing a document and need to insert an email address in your text. Now the “@” symbol is not available on the alphabetic keyboard so you’ll first have to switch to the numeric keyboard (?123), tap “@” and then again switch to ABC mode.

That’s three keystrokes for typing one key. There’s a simple option as well – just press the ?123 key, slide the finger to reach the “@” key and then lift the finger up to release the key. You can use the trick to type numbers, punctuations marks, currency symbols and all other characters that’re found only on the numerical keypad of your iPhone or iPad.